Hi everyone! This week we'll see some demonstrations about the usage, function and configuration of two important modulated short delay effects, which are Flanger and Chorus. This topic corresponds to lesson from week 5 of Introduction to Music Production at Couresera.org.
Delay is one of the most common effects used in audio production today. As we've seen before, delay is related to Propagation. A delay processor works by sending the input signal to the output at a later time (Delay time), then the signal is combined with the original (Mix control), and finally, signal is repeated determined number of times (Feedback control). Thanks to this, the delay effects give us a sense of space and illusion of dimension by using ‘repetitions’ of the original signal.
Between the delay effects we can mention: flangers, phasers, choruses, delays or reverbs, and to specify, the effects that make up the modulated short delays are choruses, phasers and flangers. For effect of this article, we'll work just with chorus and flanger.
Flanger and Chorus - Similar, but not the same
Flanging, and chorusing are pretty standard pieces in every engineer’s effects arsenal today, but while they may seem to offer a similar effect, they’re certainly not the same. The most simple difference between them is that the flanger uses a shorter delay than the chorus, as we can see in the next figure:

Flangers, phasers and choruses all work by producing a series of frequency notches that are slowly swept across the frequency bandwidth (that’s the modulation). We don't really hear the notches; we hear what's left in the frequency spectrum, which is a series of peaks. Flangers and choruses have a larger number of notches that are spaced harmonically.
Demonstration
The better way to demonstrate these effects is by listening and comparing the sounds over the configuration process of the effects. I'll show you some configurations used by me on a song of my band. Let's hear first the excerpt of the track without delay effects.
In the track there are two guitars recorded: an overdriven lead guitar and a clean rhythm guitar.
For this lesson I used the effects integrated in my DAW (Cubase 5). Let's start!
To add an effect, we have to go to the Insertions section of the track desired, click on any Insertion channel (there are 8 available per track), and select the desired effect. For Flanger and Chorus we have to click first on the Modulation menu and then select the effect.

Now, for the Lead guitar let's select a Flanger. The Cubase Flanger is the classic effect, with some stereo improvements. Here you can see the controls and default values.
This effect has many settings to set up, like:
- Rate: Specifies the value of the note to synchronize the sweep.
- Range Lo/Hi: Establishes the limit frequencies for the sweep.
- Feedback: Determines the flanger type.
- Spatial: Establishes the stereo amplitude.
- Mix: Adjusts the balance between the processed signal and the unprocessed.
- Shape: Changes the waveshape.
- Delay: Adjusts the initial time delay.
- Manual: Determines the modulation adjusting the sweep.
- Filter Lo/Hi: Determines the allowed frequencies to pass.
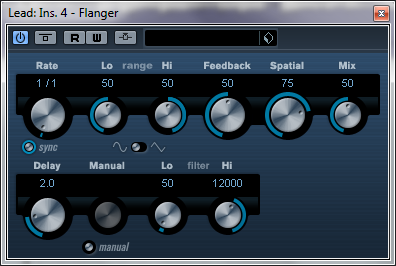
Moving and hearing the knobs for a while, I found a sound a liked with this configuration:

I chose this sound for being not so "metallic" and having a really soft sweep, which provides to the guitar a "deep and spatial" sound.
Now, let's work with the rhythm guitar. On this track, we insert a Chorus, by following the same steps as before with the Flanger. The Cubase Chorus is an one-phase effect, which works doubling the input signal with another slightly detuned.
The Chorus' controls are almost the same as the Flanger controls. The Range Lo/Hi controls are replaced by the Width, and the Feedback and Manual knobs disappear. The Width determines the depth of the chorus.

Similarly, I found a sound a liked with this configuration moving the knobs for a while:

This effect was chosen because gives the necessary depth for the rhythm guitar to fill the space and be a quite good backing all over the track.
Reflections
Once again thanks so much for reading and follow my articles. This is a very fun and important topic, because these effects are so commonly used in recordings, so important and useful. Personally, I have these two effects in pedals for my guitar, and investigating about the correct usage of the controls gives me the chance to get more great sounds and a better performance for my band. I really hope you could find this information useful as I did.
As always, I invite you to take the audio files and explore new configurations besides the ones I showed you here. See you!
No hay comentarios:
Publicar un comentario