Hello again everybody. According to lesson for week 4 of Introduction to Music Production at Coursera.org, this week's topic is about how to use effectively a compressor in a musical context.
Basic concepts
Compression is one of the most important and used effects
while recording. The songs we hear on the
radio can go through 4 or even 5 different compressors. Due to the big importance, becomes useful the understanding of how
compression works and how it can be applied efficiently.
Compression works by reducing the volume of the louder sections of a track and increasing the volume of the quieter sections, giving more consistency to tracks. This effect can also be used to bring
out some important details: helps to control a vocalist with bad mic technique, limit
distortion from loud sounds or increase the average
level of a track, making it sound louder.
Compression Controls
Commonly, compressors offer some basic controls: threshold, ratio, attack and release. This controls allow to adjust the compression settings to get the desired results.
The threshold control, measured in dB, determines at what level the compressor kicks in to action. In other words, how
loud the signal has to be before its volume is reduced, or the time the compressor has to wait before start working. Setting the Threshold high means less compression, and a low Threshold means compressor will do more.
When the input signal passes the threshold level, the gain is lowered by the ratio control. For
example, with the ratio set at 2:1, an increase in input of 2 dB over the
threshold will result in an increase in the output of 1 dB. Higher ratios
means more compression applied, only to the signals which passed the threshold level.
The Attack and Release controls work together with the threshold control to determine when compression should begin and end. Specifically, Attack control refers to how much time waits the compressor to start processing the input signal once it achieves the Threshold, and Release control determines the time the compressor will keep processing the signal once this one has fallen below the Threshold level. It is important to keep in mind that if the input signal is above the Threshold for less time than the Attack setting, then compression may not occur. Setting a long attack allows transient waves to pass through before start compression; a short attack will cause the signal to be almost instantly compressed. On the other hand, a long release gives a natural sound, and a short release time will cause no compression instantly, causing an unnatural or distorted sounds.
The Attack and Release controls work together with the threshold control to determine when compression should begin and end. Specifically, Attack control refers to how much time waits the compressor to start processing the input signal once it achieves the Threshold, and Release control determines the time the compressor will keep processing the signal once this one has fallen below the Threshold level. It is important to keep in mind that if the input signal is above the Threshold for less time than the Attack setting, then compression may not occur. Setting a long attack allows transient waves to pass through before start compression; a short attack will cause the signal to be almost instantly compressed. On the other hand, a long release gives a natural sound, and a short release time will cause no compression instantly, causing an unnatural or distorted sounds.
How to adjust the compression. An example in Cubase
An important thing to have in mind is that every unit and every track is different. I recommend to start by setting a high threshold, low ratio and both the
attack and release in a mid position. Then, move the threshold control down
until feel that the compressor is
reducing the signal. From there, adjust the controls bit by bit until get what we want, which may be a particular sound or a particular
reduction in dynamic range. Here's an example using the Cubase Compressor over an clean electric guitar extracted from a track of my own music.
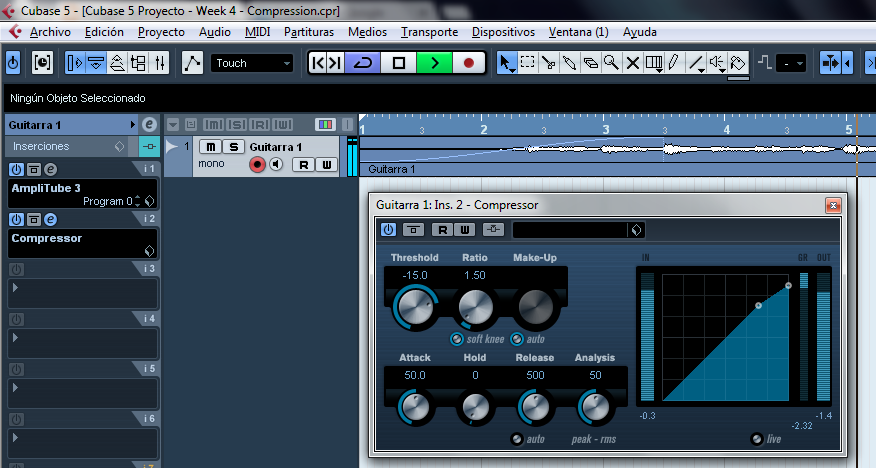
Following the instructions above, move down the Threshold until it reaches a desired level, which is after the compressor starts processing the signal. After that, set the Ratio level moving it bit by bit until get the desired sound. For this example, I moved the Threshold down to -30, and the Ratio to 6.


The Attack and Release times should generally correspond to the speed of the instrument. For example, bass tracks should normally use slow attack and release times while drum tracks usually sound best with fast times. Like we are using an electric clean guitar, I recommend to set long Attack and Release times. For this example I used 80 for the Attack and let the Release in 500, which is the middle position established before.

Following the instructions above, move down the Threshold until it reaches a desired level, which is after the compressor starts processing the signal. After that, set the Ratio level moving it bit by bit until get the desired sound. For this example, I moved the Threshold down to -30, and the Ratio to 6.
The Attack and Release times should generally correspond to the speed of the instrument. For example, bass tracks should normally use slow attack and release times while drum tracks usually sound best with fast times. Like we are using an electric clean guitar, I recommend to set long Attack and Release times. For this example I used 80 for the Attack and let the Release in 500, which is the middle position established before.
Once established the threshold, ratio, attack and release
settings, we should look at the meters and increase the gain to avoid the gain reduction imposed by the compressor. This can be done with the Make-Up control. Typically the gain on
the compressor is set equal to the gain reduction shown on the meters.

Reflections
When I was learning the basics of compression with a compressor pedal for my guitar, I
over-compressed the whole thing, what didn't help the sound at all. Compression is a great tool for mixing when we know how to use it well. Finding the right balance is the key, and the only way to
do that is to practice and listen, with own mixes or with the mixes of our favorite music: some forms of music, especially acoustic music, sound best without any compression at all; electronic music, punk, and hip-hop often use huge amounts of compression; folk, country and other similar genres typically benefit from moderate compression.
Thanks once again for reading this week. I invite you to use the uncompressed audio in the first link and do these examples and experiment with some other values too. You can also listen to my band Tephros in the Soundcloud player at the right side of this page. We are re-recording the published tracks with the knowledge acquired in this course to get a better sound, and we are making it! Greetings and enjoy!
Thanks once again for reading this week. I invite you to use the uncompressed audio in the first link and do these examples and experiment with some other values too. You can also listen to my band Tephros in the Soundcloud player at the right side of this page. We are re-recording the published tracks with the knowledge acquired in this course to get a better sound, and we are making it! Greetings and enjoy!
No hay comentarios:
Publicar un comentario